-_-_-
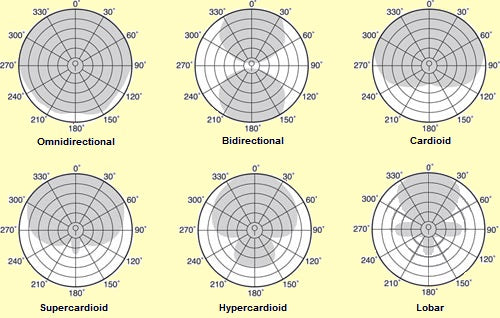
What causes feedback? By definition, feedback is caused by a ‘looped signal’, that is, a signal which travels in a continuous loop. That annoying screechy sound is caused by many different things. A microphone, an amplifier and one or more speakers, makes up the basic components of your PA system. These three elements together can potentially produce feedback, like when the sound from the speaker is reamplified via the microphone, creating a looped signal. There are many ways to deal with feedback, but here are some basic methods that sound and systems engineers make sure of. 1. Mic positioning and choosing the right mic Different microphones have different pickup patterns. A pickup pattern is basically the way a microphone picks up sound and also rejects sound. Look at the patterns as though you are viewing them from the crowd and the mics are on stage. Why this is important? You must know the pickup pattern of a microphone as this is key in the mic’s placement on stage. Whether you use a dynamic cardioid or an omnidirectional mic, the crucial part is the placement along with the speakers and monitors or wedges on stage.
The chart above will explain the difference in pickup patterns. The coloured portion indicates the area where the mic will pick up a signal.
If you position a monitor on stage directly behind a microphone (where the pickup pattern is least for a cardioid pattern), then there is less chance that the signal will feed back into the microphone as it is less sensitive from the rear of the mic. Of course, you won’t always be able to position the mic perfectly, but you will be able to visually understand and bring problems related to placement of mics and monitors to a bare minimum. Also, the closer the microphone is to the source, the lesser the chance of feedback. For example, a singer would be the source, so the closer the mic is to the singer’s mouth, the lesser feedback caused because there would be lesser reason to crank up the gain. Based on the pickup patterns, you can choose ideal microphones keeping your requirements and setup/stage plot in mind.
2. Practice ringing out
A common practice for many sound engineers is ringing out the monitors and the system before beginning a check. Using a graphic equalizer, an engineer can reduce the levels of frequencies that would tend to feed back, like high frequencies. Feedback can occur at different frequencies too, but not so much below 80 Hz or above 8 Hz. One of the things you can do is slowly bring up the level of the system until you hear feedback. Once this happens, you can detect the offending frequency and bring it down, by say 3db. It takes time to actually understand how best to EQ a system, but not to worry, it comes with practice.
3. When it does, figure out where the feedback comes from
One of the most important and fighting steps as an engineer/musician is knowing the source of the feedback. As mentioned in the previous point, you can push levels slowly even on a channel to know after what point you cannot go, so make a mental note of it. You may tend to forget when you need some immediate change when mixing live, and you may be able to get some headroom, but as soon as other elements on the stage stop - like the rest of the band - the feedback can slap you in the face!
4. Check on your high levels
The first step is to make a mental note of channels that could potentially feed or cause trouble. For example, if you know there’s a mic that’s near the limit of feeding back, be very careful with what you do when pushing the levels higher. The best thing to do is make sure there is no fault from the signal source at the sound console. This could be in the form of a mic whose position has been shifted on stage by mistake, and so on.
5. Speaker positioning at the concert
Many people often make a mistake when rigging the PA for a live setup. You cannot have the main speakers in line with the band or behind them, as they always need to be ahead in front of the stage. Speakers also have a throw angle; they do not just project sound directly in front of them, so it is possible that the sound may bounce back from the sides or the walls and this very often causes feedback. Your wedges or stage monitors should also be in front of the microphones. So what you get from a stage point of view is first the mics, then the wedges and outside up ahead from there, the PA.
6. Muting unused mics
If mics are not in use, you can just turn them off. Unnecessary frequencies can meddle with mics that are just positioned or that could shift position by mistake, especially when you have a backing vocalist that moves around a lot. The bleed from stage noise can be prevented if mics that are not in use are muted.
7. Acoustics tend to change
There’s a difference between when you soundcheck in an empty venue and when the crowd gets in during the show. The more the bodies in the room, the more high frequency is absorbed. The audience can be the reason for some noise, so be sure you have enough headroom to make amends during the show.
Hope you find this article useful. Keep an eye out for more #BAJAAOTechWeek articles only on BAJAAO - India's no.1 online music superstore! Check out our categories for live sound equipment on our site. There may be something you're looking for!
Portable PA Systems | Floor Monitors | Installed Sound | Live Sound Processors | Mixers | Passive PA Speakers | PA Systems | Power Amplifiers | Stands and Accessories
-


Share:
8 Indian Bands To Watch Out For In 2016
#SingYourZubaan and BAJAAO!